top of page

|

The Chillout Stove
.png)
BACKGROUND
This gadget is for an ICAM(Interdisciplinary Computing and the Arts) project that I have done over the span of 2 weeks. The Chillout Stove project is an innovative approach to regulating the temperature of a stove. This project involves the use of an Arduino microcontroller, a temperature sensor, LEDs for visual feedback, and C++ programming skills to create a device that can automatically adjust the heat output of a stove based on the temperature.
INSPIRATION
The inspiration behind the Chillout Stove project stems from the desire to solve a common problem: There are times when I have been craving a quick and easy meal, such as instant noodles, but have been frustrated by having to wait for the food to cool down to a safe and comfortable temperature. This experience led me to think of a solution that could make this process more efficient.
We live in a modern era, and we want everything to be automatic. In this project, I intended to utilize an automatic fan that will be ON and OFF according to the temperature level. The project not only solved a common problem but also showcased the potential of technology to make everyday tasks easier and more efficient.
TOOLS
-
Breadboard (generic)
-
Arduino UNO
-
Resistor 330 ohm
-
5 mm LED: Red
-
5 mm LED: Green
-
Temperature Sensor
-
Geared DC Motor, 12 V
-
Fan Blade
-
Arduino IDE (Software)
CONNECTIONS
The idea for this project is to have Arduino UNO make the decision when the Fan will ON or OFF. Arduino will connect with a temperature sensor, then read the temperature value from the sensor to monitor the temperature of the stove. When the temperature rises above a set threshold, the Arduino microcontroller triggers a fan to spin at a higher speed, which helps to cool down the stove and maintain a consistent temperature. For a better visual presentation, I decided to add two led lights to indicate different stages.
I started by watching a lot of tutorial videos online for an in-depth understanding of Arduino and also to figure out how to connect the sensors, resistors, and motor with the Arduino breadboard.
An overview of the connection looks like this:
-
Arduino Pin (A0) -------> Temperature Sensor (Vout)
-
Arduino Pin (2) --------> Green Led (Anode)
-
Arduino Pin (4) --------> Red Led (Anode)
-
Arduino Pin (7) --------> DC Motor Positive Pin

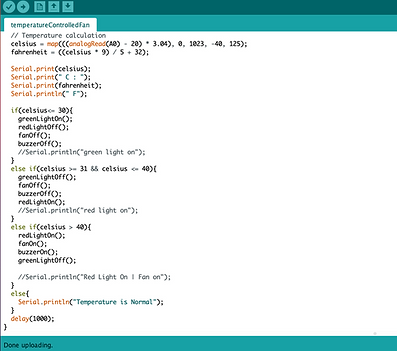
CODE
To implement this project, knowledge in C++ programming was necessary. The programming skills were used to write the code for the Arduino microcontroller, which processes the input from the temperature sensor and controls the fan.

INTERACTIVE PHYSICAL PROTOTYPE
The inspiration behind creating the visual representation of this project's interactive prototype came from a desire to explore new ways of innovating the cooking process. The idea came from a simple question
: if a stove can heat up food, why can't it cool things down?
The name "Chillout Stove" for this project aims to promote a message of relaxation and stress relief. Late-night cravings for comfort food often arise as a result of the stress and pressure of schoolwork, and this project was designed to alleviate some of that stress by making it easier and more convenient to prepare a quick meal. The name "Chillout Stove" was chosen with this idea in mind, reminding users to take a break and relax during their late-night study sessions, rather than letting stress take over. The name not only reflects the purpose of the project but also encourages a healthy and balanced approach to life.


VIDEO DEMOS
How the fan works:
Interactive Prototype:
Final Presentation:
bottom of page